installing new relic agent in linux command line. getting complicated due to aggressively forcing other application agents.
Note: You cannot install APM without new relic Infrastructure agent which monitors the linux system CPU, RAM, Disk Process) you can do it by Linux htop command.
New relic has direct integration with Cloud and platform technologies
Amazon Web Services
Amazon ECS
Microsoft Azure
Google Cloud Platform
Kubernetes
Lambda
Prerequisites:
- Create account at New relic and
- Obtain API key, Most Instructions available within new relic dashboard Due to heavy automated Process we may fail.
Ex: mysql host agent.
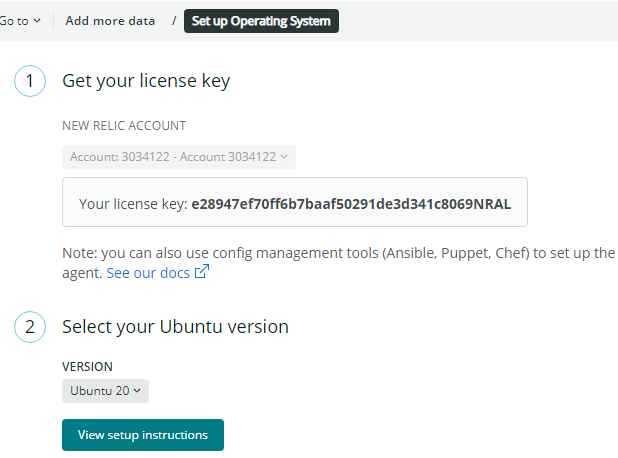
new relic installation linux ubuntu infrastructure agent
this we may help you official new relic guide to install infrastructure agent.
Check your linux version
lsb_release -a
Description: Ubuntu 18.04.5 LTS
Release: 18.04
Codename: bionic
Add the New Relic Infrastructure Agent gpg key
curl -s https://download.newrelic.com/infrastructure_agent/gpg/newrelic-infra.gpg | sudo apt-key add – && \
\
# Create a configuration file and add your license key \
echo “license_key: e28947ef70ff6b7baaf50291de3d341c8069NRAL” | sudo tee -a /etc/newrelic-infra.yml && \
\
# Create the agent’s yum repository \
printf “deb [arch=amd64] https://download.newrelic.com/infrastructure_agent/linux/apt bionic main” | sudo tee -a /etc/apt/sources.list.d/newrelic-infra.list && \
\
# Update your apt cache \
sudo apt-get update && \
\
# Run the installation script \
sudo apt-get install newrelic-infra -y
you can copy entire thing and paste on the terminal. once you logged with new relic.
API key different for every user.
Receive data
Check New relic Infrastructure agent installed or not
ps aux | grep newrelic
root@-s-4vcpu-8gb-blr1-01:~# ps aux | grep newrelic
root 3498 0.0 0.0 705820 664 ? Ssl Apr21 0:01 /usr/bin/newrelic-infra-service
root 3512 0.5 0.3 723528 27584 ? Sl Apr21 120:26 /usr/bin/newrelic-infra
Check New relic Infrastructure agent running or not
sudo systemctl status newrelic-infra
root@-s-4vcpu-8gb-blr1-01:~# sudo systemctl status newrelic-infra
● newrelic-infra.service – New Relic Infrastructure Agent
Loaded: loaded (/etc/systemd/system/newrelic-infra.service; enabled; vendor p
Active: active (running) since Wed 2021-04-21 16:54:15 UTC; 2 weeks 0 days ag
Main PID: 3498 (newrelic-infra-)
Tasks: 33 (limit: 4915)
CGroup: /system.slice/newrelic-infra.service
├─3498 /usr/bin/newrelic-infra-service
├─3512 /usr/bin/newrelic-infra
└─3673 /var/db/newrelic-infra/newrelic-integrations/logging/fluent-bi
Start, stop, and restart the new relic infrastructure agent linux
debian, ubuntu, aws, gcp, do, cloudways
sudo systemctl <start|stop|restart|status> newrelic-infra
sudo systemctl stop newrelic-infra
sudo systemctl restart newrelic-infra
sudo systemctl start newrelic-infra
New relic Infrastructure agent monitoring metrics
we can see at new relic dashboard.
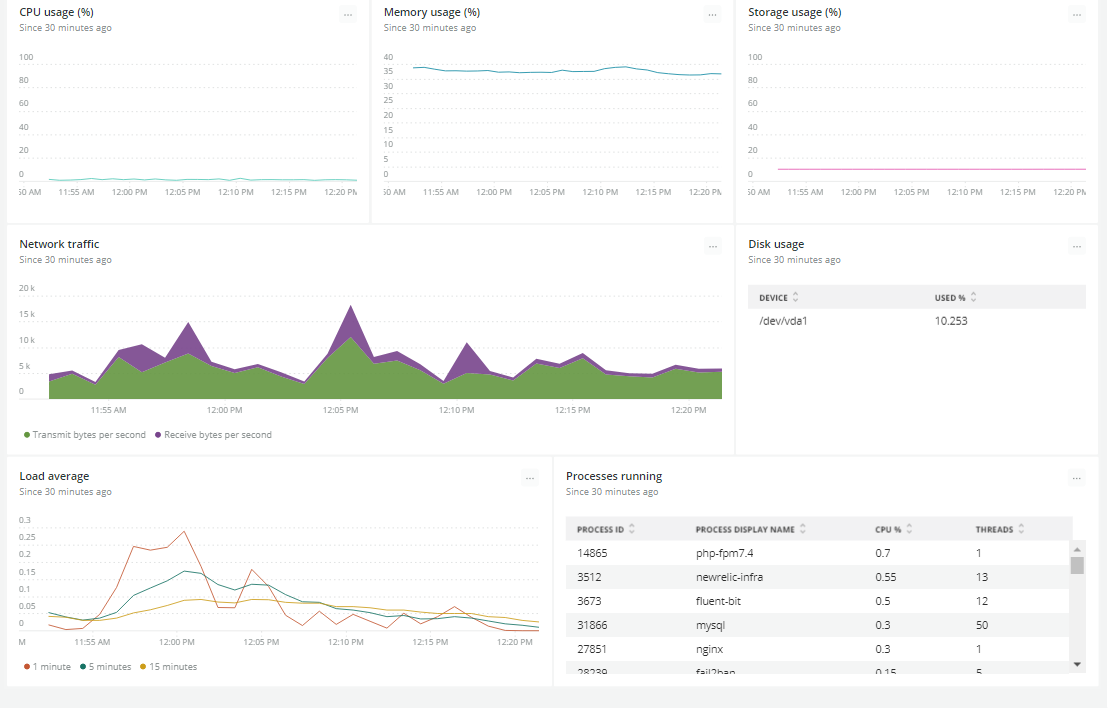
these metrics may not useful, if your host has default monitoring agent within cloud dashboard like digital ocean, gcp etc.
Install New relic php Agent
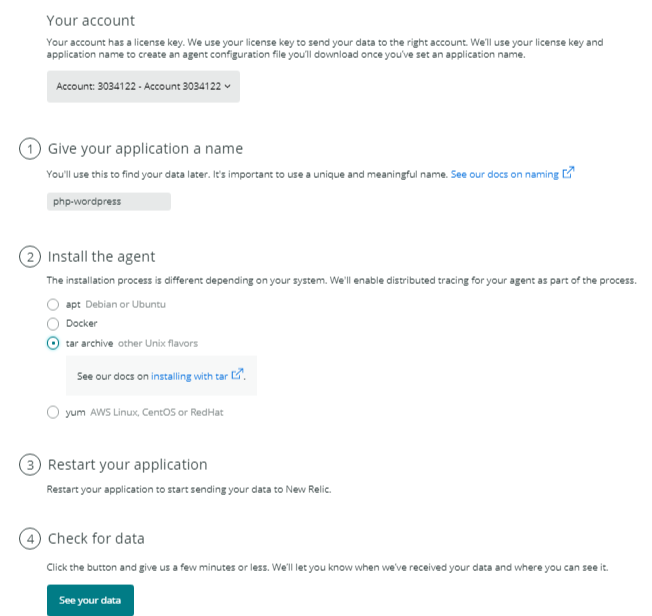
it’s a ubuntu so i select apt repository.
Configure the New Relic apt repository
(you only need to do this once per system):
echo ‘deb http://apt.newrelic.com/debian/ newrelic non-free’ | sudo tee /etc/apt/sources.list.d/newrelic.list
Trust the New Relic GPG key
wget -O- https://download.newrelic.com/548C16BF.gpg | sudo apt-key add –
Update the local package list & install new relic php agent
sudo apt-get update && sudo apt-get -y install newrelic-php5
This works with PHP 7 too. but not php 8 right now.
Finish installing the new relic php agent:
sudo NR_INSTALL_SILENT=1 newrelic-install install
Configure your license key and application name:
sed -i -e “s/REPLACE_WITH_REAL_KEY/e28947ef70ff6b7baaf50291de3d341c8069NRAL/” \
-e “s/newrelic.appname[[:space:]]=[[:space:]].*/newrelic.appname=\”php-wordpress\”/” \
-e ‘$anewrelic.distributed_tracing_enabled=true’ \
$(php -r “echo(PHP_CONFIG_FILE_SCAN_DIR);”)/newrelic.ini
/etc/phpX.Y-sp/conf.d/newrelic.ini. This is where you can edit and add your New Relic license key, if required.
REPLACE_WITH_REAL_KEY = go to new relic account settings and get the one.
Accounts settings” page at https://rpm.newrelic.com/accounts/(YOUR_ACCOUNT_NO)
INGEST – LICENSE
License Key for Account 3034122
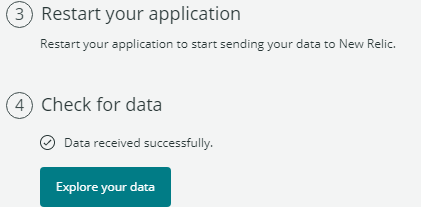
confirm that New Relic installed or
phpinfo() page.
or
ps aux | grep newrelic
restart php server application
sudo service php7.4-fpm restart
check php agent data receiving to new relic or not
STOP Restart new relic php agent
systemctl restart newrelic-php5
systemctl status newrelic-php5
service newrelic-php5 stop
or php fpm server
systemctl restart php7.4-fpm
More detailed info at new relic php agent instlation
installing new relic mysql agent in linux
Step 1 run this command
curl -Ls https://raw.githubusercontent.com/newrelic/newrelic-cli/master/scripts/install.sh | bash && sudo NEW_RELIC_API_KEY=NRAK-Q8QNCMEW58VMJ2A5ORFQUWNOH9W NEW_RELIC_ACCOUNT_ID=3034122 /usr/local/bin/newrelic install -n mysql-open-source-integration
It ask you to create database and user
==> Installing mysql-open-source-integration…
To capture data from the MySQL integration, you’ll first need to meet these prerequisites:
– MySQL version requirement (see https://docs.newrelic.com/docs/integrations/host-integrations/host-integrations-list/mysql-monitoring-integration#req)
– User with replication permissions
To create a new user, use these commands as reference (Note: username,
password, and similar user-specific values must be replaced):
> sudo mysql -e “CREATE USER ‘newrelic’@’localhost’ IDENTIFIED BY ‘YOUR_SELECTED_PASSWORD’;”
> sudo mysql -e “GRANT REPLICATION CLIENT ON *.* TO ‘newrelic’@’localhost’ WITH MAX_USER_CONNECTIONS 5;”
> sudo mysql -e “GRANT SELECT ON *.* TO ‘newrelic’@’localhost’ WITH MAX_USER_CONNECTIONS 5;”
? MySQL Username
? MySQL Username newrelic
? MySQL Password ********
? MySQL Hostname (default: localhost) localhost
? MySQL port (default: 3306) 3306
? MySQL Database Name newrelic
[Error]: Provided user has no access to the desired database. See https://docs.newrelic.com/docs/integrations/host-integrations/host-integrations-list/mysql-monitoring-integration#config for more info.
2nd method mysql integration new ric
sudo apt-get install INTEGRATION_FILE_NAME list here
sudo apt-get install nri-mysql
cd /etc/newrelic-infra/integrations.d
in case not
cp mysql-config.yml.sample mysql-config.yml
Edit the configuration file mysql-config.yml
nano /etc/newrelic-infra/integrations.d/mysql-config.yml
hostname: localhost
port: 3306
username: newrelic
password: <YOUR_SELECTED_PASSWORD>
Restart the new relic infrastructure agent.
sudo systemctl restart newrelic-infra
New relic nginx installation
curl -Ls https://raw.githubusercontent.com/newrelic/newrelic-cli/master/scripts/install.sh | bash && sudo NEW_RELIC_API_KEY=NRAK-Q8QNCMEW58VMJ2A5ORFQUWNOH9W NEW_RELIC_ACCOUNT_ID=3034122 /usr/local/bin/newrelic install -n nginx-open-source-integration
? NGINX status URL (default: http://127.0.0.1/status) http://127.0.0.1/status
NGINX HTTP status module must be configured for New Relic to collect data. \n – See https://docs.newrelic.com/docs/integrations/host-integrations/host-integrations-list/nginx-monitoring-integration#config for more info.
==> Installing nginx-open-source-integration…failed.
root@-s-4vcpu-8gb-blr1-01:/etc/php/7.4/fpm/conf.d# curl http://127.0.0.1/status
pool: www
process manager: dynamic
start time: 06/May/2021:14:03:02 +0000
start since: 6585
accepted conn: 726
listen queue: 0
max listen queue: 0
listen queue len: 65536
idle processes: 13
active processes: 1
total processes: 14
max active processes: 7
max children reached: 0
slow requests: 0
new relic install integrations nginx
nri-nginx
sudo apt-get install INTEGRATION_FILE_NAME list here
sudo apt-get install nri-nginx
cd /etc/newrelic-infra/integrations.d
sudo cp nginx-config.yml.sample nginx-config.yml
Edit the configuration file nginx-config.yml.
edit the config in the integration’s YAML config file, nginx-config.yml
status_url: http://127.0.0.1/status
Restart the infrastructure agent.
sudo systemctl restart newrelic-infra
Faqs on new relic installation
new relic license key vs api key
API key to : access data
License key: to differential free and commercial usage.
/”REPLACE_WITH_REAL_KEY”/”YOUR_LICENSE_KEY
Troubleshooting with new relic installation – php agent
ERROR: unsupported version ‘8.0.3’ of PHP found : php 8 not supported right as on 2021 may.
PHP Warning: Module “newrelic” is already loaded in Unknown on line 0
Big issue delete two typ[es of files in /available mod /7.4 and 8.0 if any and apache2/php mods
20-newrelic.ini
newrelic.ini
ls -l /etc/php/7.4/fpm/conf.d/
/etc/php/7.4/mods-available
sudo rm /etc/php/7.4/fpm/conf.d/20-newrelic.ini
you can remove php extension or module
sudo rm /etc/phpv.4/conf.d/EXTENSION.ini
my case php located /etc/php/7.4/fpm/
/etc/php/7.4/fpm/conf.d/newrelic.ini is there installed last time.
you can see error logs
/var/log/newrelic/phpagent.log
2021-05-06 07:39:00.605 +0000 (18049 18049) warning: A global default license has not been set or has invalid format. Please add a ‘newrelic.license‘ key in the global php.ini or in the newrelic.ini file, or ensure that a valid license is provided on a per-virtual host or per-directory basis.
if you see newrelic.license = “REPLACE_WITH_REAL_KEY” at newrelic.ini php module
sudo rm /etc/php/7.4/fpm/conf.d/newrelic.ini
new relic mysql instlation trobuble shoting
[Error]: Provided user has no access to the desired database. See https://docs.newrelic.com/docs/integrations/host-integrations/host-integrations-list/mysql-monitoring-integration#config for more info.
sudo service mysql restart
localhost does not match % in MySQL